Choosing the best material for a shed base doesn’t need to be complicated. Homeowners only need to consider details such as the size and weight of the shed, its intended use, and the ground conditions.
Each material is best suited to different types of shed, so read on to learn more about which material will work best for your project.
Concrete shed base
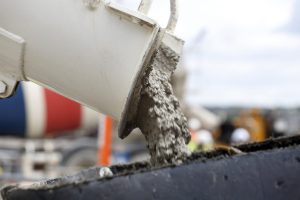
For a large shed, workshop housing heavy equipment, or a garage, a concrete base is necessary to support the structure and ensure there is no movement.
But, there’s no doubt that building a concrete shed base is hard work. Turf and soil must be excavated and disposed of, the form needs to be made, sub-base has to be laid and compacted, damp-proof membrane added, and the concrete mixed, poured, and levelled. As a result, the typical concrete shed base cost is higher than that of other materials.
But it’s one of those jobs that once it’s done, it’s going to last — as long as it’s done right. Good preparation, careful planning, constant checks during installation, and oversight of the curing process will all ensure a good result.
The base should be left for at least 7 – 10 days if a heavy shed or workshop is going on top. Although the concrete won’t be fully cured for around 28 days, the base will have achieved 70% of its strength after a week or so.
Concrete provides a durable and resilient foundation that prevents any twisting of the shed structure and won’t need to be replaced.
Plastic grid system
Those looking for a quick DIY solution will find the plastic grid system appealing. It can be put down in a couple of hours, is easy to work out, and is relatively inexpensive.
But just because something is simple doesn’t mean it can be just thrown together and expected to work without any issues. The plastic grid system is easy, but taking the time to install it properly and with the right materials ensures it lasts as long as it should.
Although it’s a faster system, the ground still needs to be dug out, levelled, and a sub-base applied. Uneven ground can be levelled quickly by putting down some builders’ sand or pea gravel. Checking the levels at each stage of construction is important.
Once level and compacted, a membrane is laid on the sub-base and the grid system assembled on top. For a lightweight shed, only the perimeter of the grid needs to be filled with gravel, but for heavier constructions, the entire base should be filled.
It’s possible to either make the grid slightly bigger than the shed floor and fill the perimeter with gravel to act as a French drain. Or conform the grid to the exact dimensions of the shed for a neat finish.
Timber support for a shed
A timber support base is another relatively quick and straightforward way to provide a solid foundation for a shed. In terms of cost, it sits between the plastic grid system and the concrete base, offering both affordability and durability.
Although the shed is held off the ground by a wooden frame, the ground itself has to be level and reinforced. This means, like the concrete and plastic grid bases, the area should be excavated and an appropriate sub-base laid down. The depth doesn’t have to be as deep as for the concrete base, just enough to provide a compacted foundation of aggregate or gravel.
The frame should be made from pressure-treated or ‘tanalised’ timber, which can also be treated with a waterproofing solution. In terms of size, the base can either be exactly the same dimensions as the external floor size of the shed or slightly smaller.
The latter option creates a slight overhang, which allows runoff away from the timber base to protect it from pooling rainwater and subsequent rot.
Wrapping up
Choosing whether to use a concrete, plastic, or timber shed base will depend on a homeowner’s budget, shed size and use, personal preference, and ground conditions. Each will do the job for which they’re designed as long as they’re correctly installed.